UPDATE 2015-01-31: AIMSICD is an alternative to SnoopSnitch that does not require a Qualcomm MSM8210 chipset.
Jacob Appelbaum (@ioerror) wrote instructions for modifying a Motorola Moto E phone to install SnoopSnitch and — notably — removing the internal microphone and other sensors to prevent the phone from being used as a remote bug (e.g. the mic being eavesdropped whilst you’re not calling). For fun, I bought the exact model Jacob mentions, a Moto E XT1021, at a Dutch Media Markt store for EUR 103. Modification of the hardware is very simple and demonstrated clearly on Jacob’s page through a series of photos. You need a regular phone Torx screwdriver (a dozen or so of screws need to be removed) and something sharp to pry off both microphones; I used a potato knife (to state the obvious: removing the mic will not hide your call metadata or contents of your phone calls). I left the other sensors untouched for now. The software modification is slightly more involved. Perhaps of use to some, here are the steps it took to root the phone from an OS X 10.9 system, and to install SnoopSnitch (if you find errors or omissions, please contact me, I will correct it). Your mileage may vary.
- Get the Android SDK and Motorola’s Moto E drivers for OS X:
- Android SDK: http://developer.android.com/sdk/index.html
- Motorola MDM: https://motorola-global-portal.custhelp.com/app/answers/detail/a_id/88481 (note: OS X 10.9 isn’t officially supported, but it works. When connecting the phone to my system, some “networksetup” dialog kept popping up, but it can be ignored)
- Install both.
- Enable USB debugging:
- Turn on the phone. Go to the “Settings” screen, then to “About phone”. Touch “Build number” entry 7 times to get the “Developer options” menu item to appear under “Settings”. Go there and enable “USB debugging”. On connecting to a computer, a dialog will pop up asking whether to permit USB debugging from that computer: press “OK”.
- Unlock the bootloader:
- Go to https://motorola-global-portal.custhelp.com/app/standalone/bootloader/unlock-your-device-a , sign in, press “Next”.
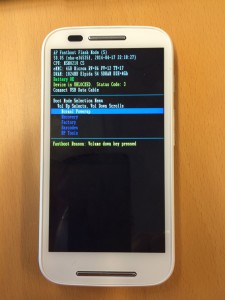
- Boot the phone into fastboot mode by pressing and hold power + volume down for a few seconds, then release. The phone should boot and show the following screen (note: at the top it lists the CPU as a Qualcomm MSM8210):
- Connect the phone to the computer using the USB cable. The message “USB connected” will appear on the phone.
- On the computer, run the following commands:
$ cd $HOME/Library/Android/sdk/platform-tools/
$ ./fastboot oem get_unlock_data
...
(bootloader) [............ part1 ..........]
(bootloader) [............ part2 ..........]
(bootloader) [............ part3 ..........]
(bootloader) [............ part4 ..........]
(bootloader) [... part5 ...]
OKAY [  0.257s]
finished. total time: 0.257s
$
- Append the five parts into one string, and enter it in the input field “Can my device be unlocked?” in the Motorola website, press “Agree”. You should receive an email containing an unlock code.
- Run:
$ ./fastboot oem unlock [.....unlock code....]
...
(bootloader) Unlock code = [.....unlock code....]
(bootloader) Unlock completed! Wait to reboot
$
- Root the phone:
- Download SuperSU (credits to @ChainfireXDA) and the CWM recovery image (credits to members of the XDA-Developers Moto-E forums), for instance these DDL mirrors:
$ wget -O SuperSU-v2.45.zip https://cyberwar.nl/d/20150124_MotoE_UPDATE-SuperSU-v2.45_MIRROR.zip
[...]
$ wget -O cwm6.0.4.9_recovery.img https://cyberwar.nl/d/20150124_MotoE_cwm6.0.4.9_recovery_MIRROR.img
[...]
$
- Connect the phone via USB, then put SuperSU on it as follows (don’t forget the trailing “/” in “/sdcard/” or it fails to copy):
$ ./adb push UPDATE-SuperSU-v2.45.zip /sdcard/
4043 KB/s (4016989 bytes in 0.970s)
$
- Disconnect the phone, put it in fastboot mode by pressing and holding power + volume down.
- Flash the CWM recovery image as follows (note: after running this command, an error message appears on the phone that can be ignored: “Mismatched partition size (recovery)”):
$ ./fastboot flash recovery cwm6.0.4.9_recovery.img
target reported max download size of 299892736 bytes
sending 'recovery' (8146 KB)...
OKAY [  0.430s]
writing 'recovery'...
OKAY [  1.123s]
finished. total time: 1.553
$
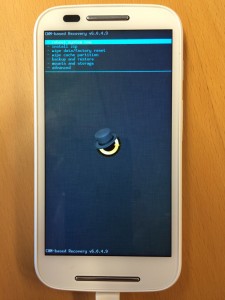
- Press volume down, then volume up. The unlocking is now triggered. Wait a few seconds until the “CWM-based Recovery” menu appears. This looks as follows:
- Press volume down to select “install zip”; then press power.
- “choose zip from /sdcard” is already selected; press power.
- Press volume down to select select “0/”, press power, press volume down several times to select “UPDATE-SuperSU-v2.45.zip”, then press power.
- Press volume down to select “Yes – Install UPDATE-SuperSU-v2.45.zip”, press power.
- Select “+++++Go Back+++++”, press power.
- “reboot system now” is selected; press power. When asked “Root access possibly lost. Fix?”, select “No” (default). Press power.
- Download SuperSU (credits to @ChainfireXDA) and the CWM recovery image (credits to members of the XDA-Developers Moto-E forums), for instance these DDL mirrors:
- Install SnoopSnitch:
- Under “Settings”, “Security”, enable “Unknown sources”, and disable “Verify apps” (else the phone will keep asking “Allow Google to regularly check device activity for security problems, and prevent or warn about potential harm?”)
- Connect your phone to the internet (e.g. via WiFi), then open https://f-droid.org/, click “Download”.
- Pull down the screen from the top, wait until the FDroid.apk download is complete. Scroll down, press “Install”. When done, click “Open”.
- Press the magnifying glass, search for “SnoopSnitch”. Press “(+)” to install it. Grant it all the privileges it requests.
- DONE.


EOF
it just says “command not found” when I enter:
$ cd $HOME/Library/Android/sdk/platform-tools/
$ ./fastboot poem get_unlock_data
I’ve done everything: Installed Android SDK, Installed JAVA DEV, Installed MOTO USB drivers. My final option is to boot into Windoze and try from there
Fastboot binary for OS X: https://github.com/simmac/minimal_adb_fastboot/raw/master/osx/fastboot
Note: the second parameter should be ‘oem’, not ‘poem’.
Also make sure your cd into the correct path. If your android folder was downloaded into another location you’ll have to cd through that path. This is the best osx tutorial ive found to rooting a moto e. Thanks